kyma•tweaky . How . UseWacomTablet

Question (or Task)

How do I set up a Wacom tablet to control Kyma Sounds?

Solution(s)

If you have a Graphire or Intuos tablet (connected by USB) and are using either Macintosh OS-X or Windows XP, you can use the Pen as a multi-dimensional controller for Kyma Sounds.

Note that Kyma can work with the tablet only when using Macintosh OS-X or Windows XP.

Initial Tablet Setup

Follow the instructions supplied with the Wacom tablet to install the drivers needed to use the tablet mouse and pen to control the computer’s cursor. Double check that you have the latest driver software (4.8.4 or later). If not, you can download the newest driver from Wacom's website.

After you install or update the tablet driver, before you use Kyma, please:

Preferences for the Pen Tablet

In the System Preferences (Macintosh) or the Control Panels (Windows) for the tablet itself (distinct from the preferences within Kyma):

Graphic templates

We recommend the use of a template as a guide for locating pitches and X and Y values when using the tablet as a controller. Templates for several Graphire and Intuos models are included as PDF files in the Tablet templates folder in the Other files folder in your Kyma folder. Print out the appropriate file (preferably on a color printer) and insert it beneath the transparent overlay of your Graphire3 or tape it to the surface of your Intuos3.

The templates show X and Y axes, a unit circle (reference for !PenRadius and !PenAngle), and a "keyboard" with a white line for each white key, a black line for each black key, a red line for each C and a blue line for each F.

If you purchased an Intuos3 4x5 tablet from Symbolic Sound, you were provided with a template to use with your tablet. To install the template, first remove the old blank template (use a piece of tape to lift up the bottom-left corner of the template and gently peel the template off the tablet), remove the strips covering the adhesive on the new template, and carefully place the template into the recess on the tablet.
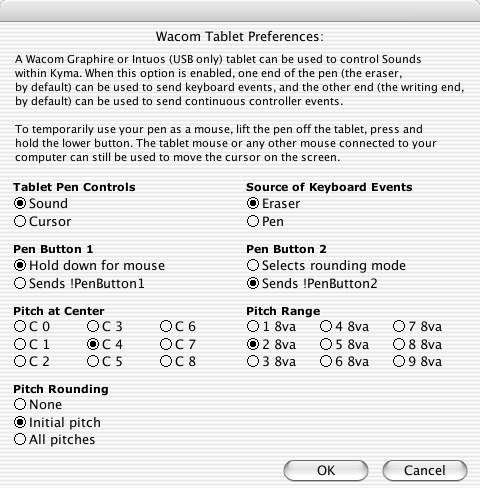
Kyma Setup

By default, Kyma will use the Wacom tablet as a Kyma Sound parameter controller. To change how Kyma works with the tablet, choose Preferences from the Edit menu and click the Wacom Tablet button:

Tablet Pen Controls

Under Tablet Pen Controls, select whether you would like to use your tablet Pen to control Sound parameters or whether you prefer to use it to control the cursor.

Only the tablet Pen is used for Sound control. You can continue to control the cursor with the Wacom Mouse on the tablet even when you have elected to control Sound parameters with the Pen. For example, you can alternate between using the Mouse on the tablet for editing parameter fields, play the Sound, then set the Mouse aside and take up the Pen to control the Sound's parameters.

Note that once you have selected Sound, Kyma controls the tablet even when Kyma is not the frontmost application. For example, as long as Kyma is running, you can bring ProTools? or your sequencer to the front and continue to use the Pen as a Sound parameter controller.

Source of Keyboard Events

One end of the Pen sends controller values, and the other end sends keyboard events. Select either the Pen or the Eraser as the source of keyboard events (the other end of the Pen will then be the source of continuous controller events). Under Source of Keyboard Events select Eraser if you'd like the eraser end to act as a keyboard; select Pen if you'd rather use the pointy end as the keyboard and the blunt end as your continuous controller.

Pen Button 1

To control the cursor in Kyma or any other application while Kyma is running, you can continue to use the Mouse on the tablet or any other mouse connected to your computer. In addition, if you choose Hold down for mouse, you can use the Pen to control the cursor by lifting the Pen from the tablet surface, and pressing and holding the lower Pen button. The Pen continues to control the cursor until the Pen button is released.

Pen Button 2

Normally, the upper Pen button sends the !PenButton2 event. If you choose Selects rounding mode, each time you press the upper pen button, the pitch rounding mode will be changed (in order): None, Initial pitch, All pitches, None, etc.

Remaining Preference Options

The remaining options control the center pitch of the tablet, the range of pitches, and how the pitch is rounded.

Continuous Controllers and Gates

A Graphire or Intuos Pen sends Kyma the following continuous controllers in rectangular coordinates:

Name Range Description
!PenX 0,1 left to right
!PenY 0,1 back to front
!PenZ 0,1 pressure (up to down)

and the following polar coordinates

!PenRadius 0,2 center outwards
!PenAngle 0,2 hard left, around the circle clockwise, ending at hard left again

It also sends the following gates:

!PenDown 0 or 1 when !PenZ exceeds a threshold
!PenButton1 0 or 1 the lower rocker button on the pen
!PenButton2 0 or 1 upper rocker button on the pen

An Intuos Pen also sends additional controllers:

!PenTiltX -1,1 degree to which top of pen slants left or right
!PenTiltY -1,1 degree to which top of pen slants backward or forward
!PenTiltRadius 0,2 degree to which top of pen slants in any direction
!PenTiltAngle 0,2 direction to which top of pen slants

An Intuos Air Brush also sends one additional controller:

!PenWheel 0,1 the wheel position on the pen (0 when wheel rotated towards the tip)

An Intuos Art Pen also sends one additional controller:

!PenRotation 0,2 the rotation of the pen axis (0 when pen axis rotated hard left)

You can use these hot event values directly in Sound parameter fields. Alternatively, you can remap existing hot values (for example !Amp) to be controlled by one of the Pen controls. To quickly map a Sound parameter to one of the pen controls:

1. Play the Sound

2. Click the pen icon at the top of the VCS (towards the right) to open the Pen Status window

3. In the Pen Status window click the Auto button for a quick, arbitrary mapping

OR

3. Select one of the Pen aspects from the menu at the center bottom of the window

4. Then select the corresponding VCS control from the menu to the right of list of Pen aspects

For full details, see the Pen Status window description below.

Keyboard mode

In keyboard mode, your Pen sends note events to Kyma Sounds:

!KeyDown threshold exceeded in the Z direction
!KeyPitch left-to-right corresponds to low-to-high pitch
!KeyVelocity pressure in the up/down direction (Z)
!KeyTimbre back-to-front corresponds to (0,1) for controlling any parameter in Kyma

Now the good news for Continuum Fingerboard fans! The same Sounds that you design using monophonic Pen control can be also controlled polyphonically using your fingers on the Continuum Fingerboard. That will translate into a much larger library of Continuum patches contributed by Kyma users all over the world (even the ones who don't have a Continuum yet).

In the preferences, you can set the keyboard range and center pitch. And you also have a choice of how equal tempered you would like the pitches to be. In the preferences under Rounding, select:

All pitches always quantize pitch to the nearest halfstep
Initial pitch initially quantize pitch to the nearest halfstep, but allow the pitch to bend afterwards
None continuous pitch with no quantization

If you are designing a Sound to be controlled by a MIDI keyboard or sequencer, you probably want to round All pitches to the nearest half step. If you are designing a Sound to be played on the Continuum Fingerboard, you should set it to Initial pitch or None. If you are using the tablet to control a creature voice or a sound effect, you probably want the None mode so you can get speech-like glides between pitches.

For real-time control over the rounding mode, choose Selects rounding mode under the PenButton2 label in the preferences.

Polyphony

If you have more than one of the same kind of tablet connected to your computer and/or are using an Intuos tablet with multiple Pens, you can have more than one Pen control. As Kyma detects Pens, it identifies them (in the order in which they are brought into proximity with a tablet) as !Pen, !Pen2, !Pen3, etc. You can use these control names directly in Sound parameter fields, for example: !Pen2X, !Pen2Radius, or you can remap them in the VCS by selecting a different MIDI channel number for each Pen and then calling the control simply !PenX, !PenY, etc.

In Keyboard mode, multiple Pens appear as multiple voices on the same MIDI channel (or like multiple fingers playing on the same keyboard).

Sound examples

Some pen-controlled example Sounds are included in the file called Pen Examples.kym in the December 04 Kyma X.1 Examples folder in the Kyma Sound Library.

Pen Status Window

To open the Pen Status window, play a Sound that has controllable parameters; then click the Pen icon at the top of the VCS:

In the Pen Status window, you can quickly link VCS controls with Pen controls. For example, in the file called 
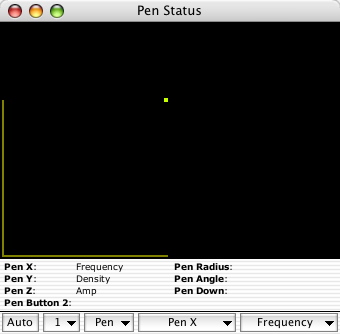
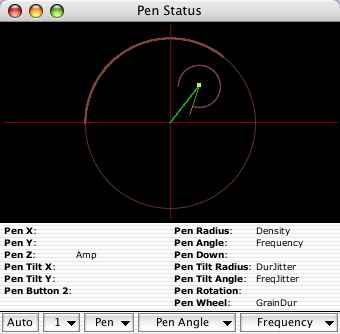
An Overview.kym in the Kyma Sound Library, play Granular classic no spectrum display and click the Pen icon found at the top of the VCS (on the right side). You can see the mapping of Pen control to VCS control at the bottom of the Pen Status window.

Above the row of buttons at the bottom of the window is a list of the controls available on the most recently used pen.

Click the Auto button for a quick, default mapping of Pen controls to VCS controls.

Choose the pen channel from the menu just to the right of Auto. Pen channel is used when you have more than one active pen and/or more than one tablet. Kyma will automatically show you the pen channel for the most recent pen. You can choose Reset Pens in this menu to force Kyma to renumber the pens: the next pen brought into proximity will be on channel 1, and each successive pen will be assigned the next channel number.

The next menu controls whether the Pen end or the Eraser end of pen sends Pen controls.

Use the next menu (labeled Pen X in the image above) to select a Pen control for remapping. (Or click the Pen control name in the list above). Then select the corresponding VCS control from the menu on the right.

As you move the pen, the aspects you have mapped to Sound parameters are displayed in the upper portion of the Pen Status window. Only the mapped pen controls are displayed. For example, if you have Pen X and Pen Y mapped to controls, the value of Pen X is displayed as a bright line across the bottom of the view and Pen Y is a bright line from the bottom to the top of the view. Pen Z is displayed as the color of a dot at the XY position of the pen.

If you have mapped Pen Radius and Pen Angle, they are displayed as the length of a line radiating out from the center of the view and as a bright arc on a circle starting from hard left.

On an Intuos, you can also map aspects of the Pen's tilt to VCS parameters. Pen Tilt X and Pen Tilt Y are shown as lines (similar to Pen X and Pen Y but with the pen point as the center. Pen Tilt Radius and Pen Tilt Angle are shown similarly to Pen Radius and Pen Angle (but centered on the pen point).

Changes made in the Pen Status window are like changes made in the VCS: They are not saved until you save the Sound.

WebForm
Question: How do I use a Wacom tablet with Kyma?
Keywords: Wacom, Intuos3, Graphire3

----- Revision r1.2 - 22 Mar 2005 - 16:38 GMT - KurtHebel
Copyright © 1999-2014 by the contributing authors. All material on this collaboration platform is the property of the contributing authors.
Ideas, requests, problems regarding kyma•tweaky? Send feedback.