Imagine a sound design playground...
...explore a sound library with over a thousand new synthesis and processing algorithms
...combine any of those algorithms to create new sounds that have never been heard before
...design new control surfaces graphically, without having to write a single line of code
...layer and sequence virtual synthesizers and effects processors in a timeline,
...tweak a parameter by adjusting a virtual fader or by drawing it in a timeline
...create new algorithms by dragging and dropping icons in a signal flow editor
...warp the spectrum of a sound in a graphical spectrum editor
...modify your instrument or your voice live on stage,
...hybridize, mutate, and transmogrify your sounds to create new audio life forms!
Kyma X — an environment for music, film sound, advertising, post production, sound design for computer games, the web and other immersive environments (Hear Kyma)
Kyma
Kyma is easy to get started with and impossible to outgrow. You can create rich and unique sounds straight out of the box. Then, over time, you can begin to take control over more and more of the details until Kyma becomes your own customized sound design environment.
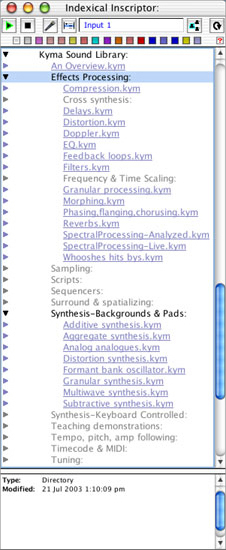
Sound Browser
Use the Sound Browser to quickly locate the sound you need from among the over one thousand sounds and effects in the Kyma Sound library. Audition a sound by pressing the play button. Click the microphone button to try out an effect on the live audio input. Click the selector button to try out an effect on a sample from your own library. Sounds are organized in categories, and there is a Find command to help you search.
You can click on any image to see a high resolution version.
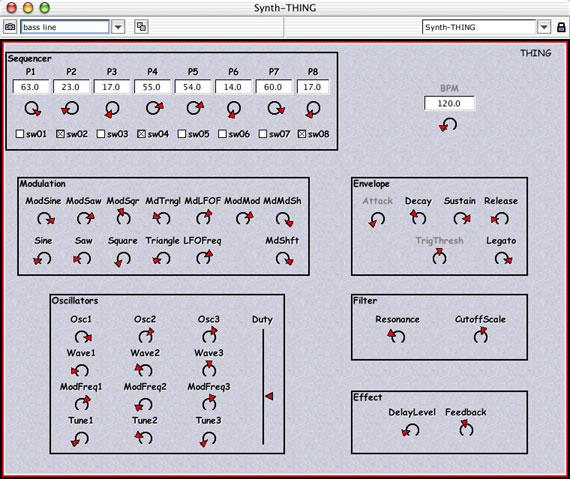
Virtual Control Surface
Each sound has its own Virtual Control Surface where you can adjust its parameters in real time. Parameters changes take effect immediately, giving you highly responsive, accurate control over every parameter of your sound.
In the Virtual Control Surface, you can choose from a list of presets. Or roll the dice and take a random walk through timbre space. When you find an interesting setting, click on the camera button to save it as a new preset.
Use the default layout for the Virtual Control Surface or edit the layout graphically to change the positioning, type, range, or name of an on-screen control.
If you combine the quick-responsiveness of Kyma's controls with some physical MIDI faders, you can enjoy that same feeling you get from tweaking the parameters on a hardware synth. And if you have a CM Labs Motor Mix, the Virtual Control Surface and the Motor Mix will automatically mirror each other. Rotary controls are mapped to the continuous rotaries on the Motor Mix, switches and buttons turn lights on and off on the Motor Mix switches, motorized faders on the Motor Mix jump to the same positions as their counterparts on the virtual control surface, and the parameter names appear on the LCD scribble strip at the top of the Motor Mix.
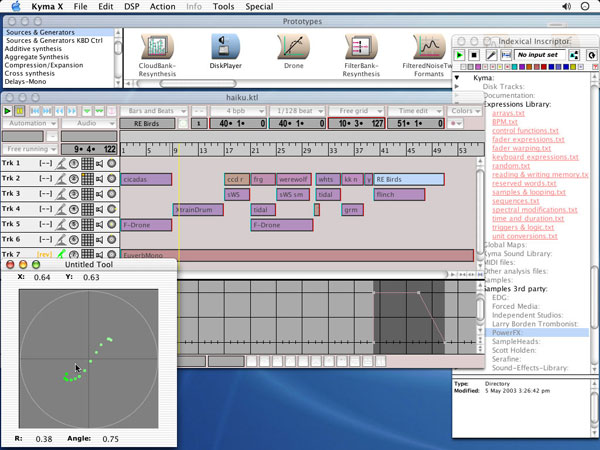
Timeline
Layer and sequence your sounds by dragging them into the timeline. Each bar in the timeline represents a synthesis or processing algorithm — a program running on the Capybara, starting at a particular time, perhaps running in parallel with other programs, and stopping at a specified time. You could think of the timeline as a "process scheduler". For example, you could create a timeline where each bar represented a different effects-processing algorithm applied to the microphone input — with each effect starting at a different time, some of them running in parallel and routed to different outputs, and some of them fading out before others.
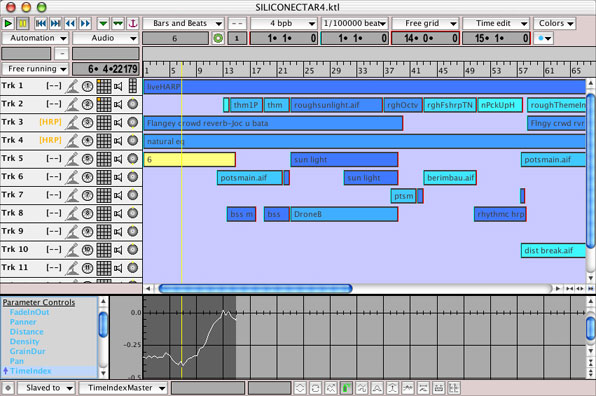
To apply an effect to a Sound in the timeline, simply drag a module from the palette at the top of the screen or from the Sound Browser, and drop it onto the sound in the timeline. To apply an effect to a submix of several tracks, simply route the submix into a new track and drag & drop the effect onto that new track.
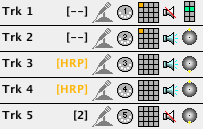
The number of tracks is unlimited; to create a new one, simply drag a Sound into an empty area. Track information — including audio input to the track, MIDI channel, submixes, mute/solo and surround sound panning position — is displayed on the left side of the timeline.
Use the timeline to spatialize tracks or individual sounds within the tracks. The timeline automatically mixes down or up to whatever number or placement of speakers you specify in the preferences. For example, you could create a mix, complete with panning, on a quad set up in your own studio, bring it into another studio or performance space where they have a full surround sound set up, and all you would have to do is to change the preferences in order for your timeline to pan over all 5 speakers and use the subwoofer.
For live performance, you can insert WaitUntil? markers to give the performer control over when or how fast time should move forward, thus freeing them from the necessity of a click track.
Parameter automation
Use the Controller editor at the bottom of the timeline to draw time-varying parameters for sounds in the timeline.

You can also record your Virtual Control Surface and MIDI fader moves, or extract a frequency or amplitude envelope from an audio signal and use it as a controller.
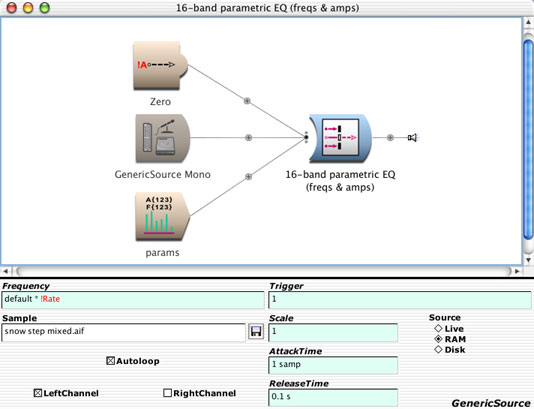
Signal Flow Editor
Double-click on a Sound in the timeline or Sound browser to see how it was created. Listen at each step along the signal path, or edit the Sound by modifying, adding, deleting, or replacing modules. Add as many modules to the chain as you like. The entire chain is evaluated on every sample, so adding a module does not increase the delay through the processing chain.

A Prototypes palette across the top of the screen gives you access to over 360 modules for sound synthesis, processing, and sampling. Drag modules from the Prototypes into your own custom signal flow diagrams.

Examine and edit the parameters of the selected module in the lower half of the signal flow editor. You can type in constant values or use MIDI faders or other audio modules as controllers. You can also use arithmetic expressions to control the way parameters evolve over time and to create dynamic relationships between parameters.
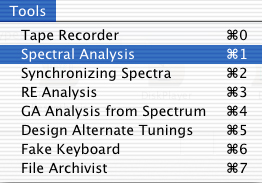
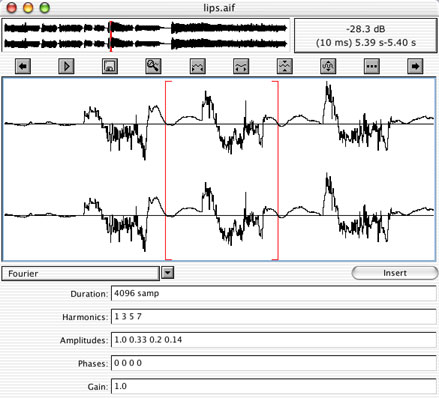
Tools & Editors
Use the Tools menu to record your own samples, perform several different kinds of spectral analysis, or design alternate tunings for your MIDI keyboard.
A built-in wave editor lets you view and modify samples. Or use the templates in the lower half of the window to generate control signals, waveshapers, or single cycles of waveforms for oscillators.
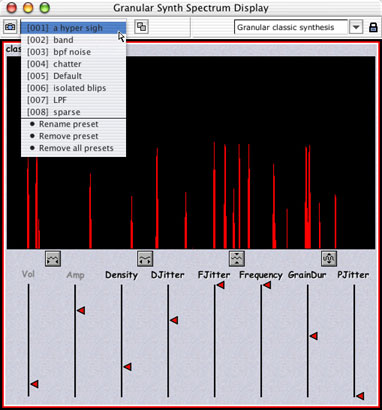
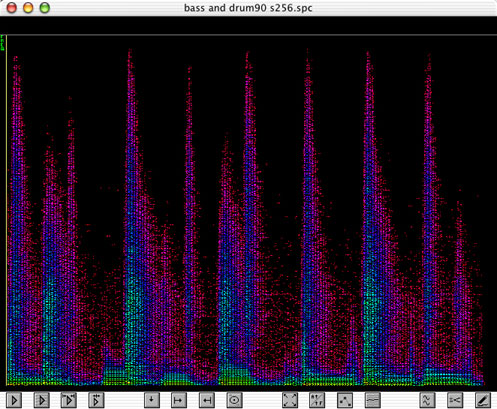
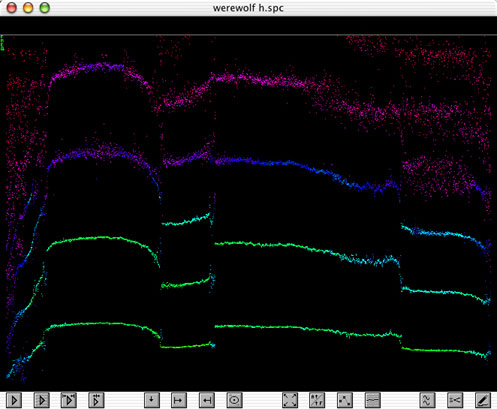
Kyma's spectrum editor shows time from left to right and frequency from low to high. The colors indicate intensity, with yellows and greens indicating the highest amplitudes and purples and blues indicating lower amplitudes. Use the spectrum editor to audition or modify the selected partial(s). Use MIDI pitch-bend to scrub.
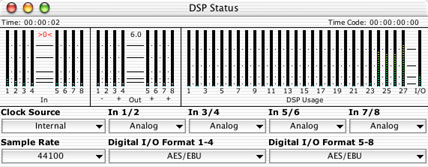
Capybara
The Capybara·320 sound computation engine provides you with 4 (expandable to 28) processors dedicated exclusively to sound computation. It also gives you 96 MB (expandable to 672 MB) of sample RAM. The Capybara connects to your laptop or desktop computer via FireWire.
For communicating with the outside world, the Capybara·320 has 4 (expandable to 8) 24-bit/100 kHz audio I/O channels, word clock and house sync inputs, VITC and LTC in and out, and MIDI in/out/thru.
Basic Configuration
- 4 processors
- 96 MB sample RAM
- 12 expansion slots
- I/O and external sync (see below)
- External rackmount or desktop case (protects the DSPs and converters from the electrically noisy environment inside your personal computer, and leaves valuable slot-space free to use for other cards on your host computer)
Expansion Card
- 2 processors
- 48 MB sample RAM (per card)
- Up to 12 cards can be added
Inputs and Outputs
- 4-8 channels
- 24-bit 32-100 kHz sample rate
- Balanced Analog & Digital (AES/EBU or S/PDIF), XLR connectors
- MIDI in / out / thru
Converters
Measurements are in A-weighted dB and were made with an Audio Precision Portable One Dual Domain audio analyzer.
|
48 kHz
|
SNR
|
D/R
|
|
A/D
|
110 dB
|
110 dB
|
|
D/A
|
105 dB
|
107 dB
|
External Synchronization
- Word Clock input
- House Sync input
- VITC & LTC time code input
Benchmarks
To give some idea of the Capybara·320's capabilities:
You can create a real-time 66-band vocoder on a basic system. On a fully loaded system, you can create a 600-band real time vocoder.
On a basic system, you can perform additive synthesis with 192 sine wave partials, each sine having its own independent frequency and amplitude envelope with any number of breakpoints in it. On a fully loaded system, you can perform real-time additive synthesis with 1743 partials.
You can generate a granular synthesis cloud with 93 simultaneous grains on a basic system. A fully loaded system can generate clouds of 837 simultaneous grains.
You can use 60 voices of samples on a basic system, and a fully loaded system gives you 545 voices.
Who could benefit from using Kyma?
If sound is an important part of your life — whether as a part of your profession or as your intense avocation — then Kyma is the ideal environment for developing and leveraging your sonic imagination.
With over a thousand library sounds and over 360 modules to choose from, you can start making incredible sounds in your very first session. But even more important is the way Kyma invites you to combine, to cross-synthesize, to modify, to modulate sounds with each other. You can get amazing results by simply dragging sounds from the browser into the timeline and by dragging effects from the Prototypes palette and dropping them onto individual sounds or track submixes. (Warning: this kind of combinatoriality is so much fun, it has been known to become addictive!)
Sound is generated in real time and is time-accurate down to the individual sample. Not only does this translate into highly responsive parameter tweaking, it means that you can bring Kyma on stage with you to process your instrument or voice, play the synthesis algorithms on a keyboard, and use the timeline to schedule different synthesis and effects processes at different times.
And you can save everything you create in the extensible sound library — not just samples, but the whole process by which you arrived at the result. So you can apply that same process to new material on your next project. Meaning that the environment grows with you, that the more you use it, the more powerful it becomes and the more it customized it becomes...until it becomes your own personal sound design playground.
For more information, see the FAQ (Frequently Asked Questions), or listen to some examples.